Monday, May 27, 2019

Wild Alaskan Orchids

Yes!  There are actual orchids indigenous to Central Alaska!

And my family knows one of the places they grow.

No, I'm not telling you.  But I'll share a picture.


These are Calypso Orchids, commonly known as Fairy Slippers.  My wife and I refer to them as "Laughing Flowers."  

They are small, easily overlooked, but lovely little flowers.  

Arrowheads On Video

Here we go!  In amazing hi-def video awesomeness!

Well, actually, it is just a camera on a tripod and my voice-over explaining what I'm doing.


As I say in the comments below the video, I really value the ability to repeat a process with very close precision.  If you show me a dozen things you've made, that tells me a range of what you can make.  If you show me that you can make a dozen of the same thing, that tells me you can make exactly what you intend to make.

As you can see in yesterday's photo (also in the video), I don't make the arrowheads identical, but I'm getting pretty close.

It was a fun project.  Now I just need to make some arrows.

Sunday, May 26, 2019

Forged Arrowheads

One of the many things I enjoy without being actually any good at it is archery.  Today, I made a dozen arrowheads with the intention of eventually putting them onto arrow shafts for shooting at my target.  Do I need hand-forged arrowheads?  No, of course not.  Are they actually better than the commercial, machine-made, uniformly identical arrowheads I can buy at the local archery shop?  Far from it.

Except for the enjoyment of shooting arrows I make myself, of course.

There is a video coming, but with the speed of connection I have here, it will take about 12 hours to upload it to YouTube.  Look for a link to be posted tomorrow.

Until then, here's the teaser photo of my dozen arrowheads:


Saturday, May 25, 2019

Walking the Dog

No dog pictures, today.  She was running around and having a good time.  I took one picture of the lake where we walked her:

 This should give you some idea of why we love Fairbanks at this time of year.

And then the youngest noticed that there was a plant with a couple of her little friends on it.  One is visible here only as a face, just above the left shoulder of the main bee in the picture.

She insists that the first bumblebee she sees in the Spring is her special friend Dolly.  Joined here by her sister Dollrayna.  (Dolly also has a daughter named Dolphin. I have no idea what will happen if she sees more than three bumblebees together.)

The whole family is remarkably fond of these lovely fuzzy girls.

Practical Blacksmithing At Home

Not an amazing thing.  Some time back, the TP holder in our half-bath broke.  It was a cheap one we got when we built the house.  We were on a really tight budget for a lot of the finish work.  We allocated the most money to the stuff that was not so easily replaced and saved a bit with the stuff that only has to be unscrewed and replaced.

However, after the old TP holder broke, I wanted something a little more "me."

This is it:


Saturday, May 18, 2019

Stringing Them Up

What do you do with 21 days of Viking beads?  There are several options, of course.

You can put them in a drawer and forget about them.

You can sell them.

You can give them away.

Or you can do what I did.  I strung them.

Current accepted wisdom is that Norse women in the Viking age normally wore their beads in half-necklaces strung between two brooches.

I'd like to note that this was still a new understanding at the time we made our version of the Hon Horde necklace.  Also, that necklace was found as part of a hoarde of treasure, not as a grave find.  I'm pretty sure the half-necklace "festoon" concept is based on grave finds, which probably do tell us more about how women would display these beads when dressed in their best.

At this time, I do not have any brooches for proper display of these bead strings, but I have ordered a pair and expect them to arrive in a couple of weeks.  

By the way, I learned the word festoon for these bead strings from Dawn's Dress Diary, a blog I really enjoy because the author does such a fine job with documenting so much of what interests her and does a truly magnificent range of clothing re-creations.  If you like what I do, I think you'll really like what she does.

I strung these bead festoons in a way that is aesthetically pleasing to modern eyes (mine), but I acknowledge that a Norse woman of 1000 years ago might have made some very different decisions about how she displayed her glass finery.  There are several people out there with their own rubrics for how to approach stringing Viking necklaces and not all the approaches are the same.  

I may end up selling these or I may end up giving them away.  For now, I'm enjoying having them strung so I can enjoy them in a different form than a ziplock baggie full of loose beads.

Next project I have to tackle is armor repairs.  Whee.  Let's see if I can be safe to fight this weekend! 

Thursday, May 16, 2019

Day 21! Last Boot Camp Bead!

Here it is!  The last of the 21 Day Bead Boot Camp!

First effort showed that my red stringer was a little too thick:


So I pulled some thinner red stringer and used that.  I also made a couple of zigzag beads without the center stripe.  I don't really like the effect of a middle stripe, but it is surprising how that one little thing makes the bead harder, so it was well worth doing it just for the experience.


The zigzag beads have long been a favorite example of Viking era beads.  If I had to pick one design that is my idea of the quintessential Viking bead, this is it.  Seems very appropriate to end on this one.

Many thanks to Dena Cowlishaw for sharing her 21 Day Bead Boot Camp and sharing it freely on her blog for all to enjoy.  It has been a good project to work through and I will be keeping the document to refer to in the future.  I certainly hope I get a chance to meet her in person and compare glass work some day.

Now I have a bag full of Viking beads and need to find a way to use them.  I have an idea, but it will have to wait.  There are some other pressing projects to get to first.  Check back for future installments!

Day 20 Again

Better this time.  Less wind.  And I lowered the torch flame to about the minimum that would still stay going.  That was part of my issue last time, I think.  Just too much heat.  I got used to working with stringer with the torch full-on, but these little loops just don't work in that situation.

First effort, I made the loops all cute and petite, but when I started to melt the white stringer flush with the surface of the blue bead, here's what happened:


The loops closed up and turned into little blobs instead.  Oh, well.  On to the next efforts.  This time, I left the loops larger and loopier than I really wanted them, but the results are almost what I was hoping for.

The one to the far right is pretty much exactly what I was trying for.  Open loops, nice and swoopy.  Great contrast between the white and the blue.  I don't really like working with this blue glass.  Beautiful color, but it picks up crud from the flame too easily.  It is really finicky glass.

I believe I could do a better/more consistent job with these with a bit of practice, but the actual bead doesn't appeal to me very much.  It will make a nice contrast to some of the other beads, but isn't what really makes me happy at the torch.  I intend to go back and make a few more with some other base color just to practice those loops, but for now I'm going to move on to the next bead.

Wednesday, May 15, 2019

A new project. And a video.

Here's what I've been up to for the last couple of days:


Took me a lot longer than I had anticipated, mostly because there were several things I hadn't done before and it always takes longer when doing something for the first time.

This was a fun project.  If I had it to do over again, I would change a few things, but the result is actually something I'm pretty proud of.  This is only the second time I've put hardware on a sword blade.  It won't be the last.  I've got ideas.

Sunday, May 12, 2019

Bead Pile Up

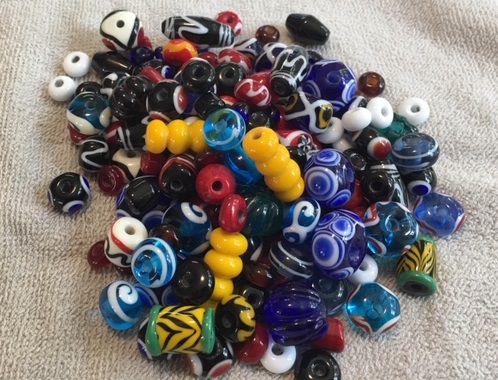
These are all of the beads I've made for the 21 Day Bead Boot Camp so far.  Not in this pile are the beads that I've rejected for just not being up to snuff.


I don't really sell a lot of beads these days.  I used to, though.  This project has largely been about getting my skills back up to where they used to be, since I'd done very little with the glass over the last few years.

I spread these beads out on the table a few minutes ago and thought about pricing.  At my former price levels (which may now be a bit low, actually), this would represent about $350 of beads.  The small seed beads are worth about 20 cents each and the large complex eye beads are in the $10 range, with all the other beads somewhere in between.

It may seem like a lot of money, but that's why the whole "starving artist" stereotype exists.  People want to get things cheaply.  I'm no different.  But when an object represents not only the time spent making it, but the years spent learning how to make it, the failed efforts that are never shown in the photos, the research, the thought, the time and effort of marketing, and still the person who created it has to compete with a mindset of "why should I pay you so much for a bead when I can go to the craft shop and get one from China for half that price?"

So the artist charges as little as will still pay the bills.  And lives cheaply.  One of the more versatile artists I know make everything from cast bronze chess sets to hand-sewn medieval turn shoes.  She told me once she works in IT because she doesn't like the "starving" part of being an artist.

I dunno.  It is hard to make money making things.

I once read a story about why we should never negotiate on the price of services.  That's telling the person an hour of his life is worth less than he thinks it is.  I extend this to include all hand work.  If you buy a bead, you may feel like you are buying the little ball of glass, but you are really buying the time of the artist.  The glass in it is relatively cheap (averages around $15 a pound, plus shipping, generally - some as high as $40), but the time of the artist is what you are paying for.

If we didn't have to work and were free to pursue our individual muses, to create, to spread beauty instead of having to go to jobs that we often wouldn't choose if we didn't need the money, what sorts of amazing and wonderful things would we come up with?

I make things because I have a need within me to create.  I suspect a lot of us have that.  It is part of what makes us human.

When is the last time you created something simply for the joy of doing it?

Day 20 - FAIL!

This one is my real hurdle.  I'll have to go back and do these again.  Perhaps several times.  Not a single one of these beads will make the cut and go into my pile of successful beads.

First, I tried the beads with the opaque light blue with white stringer:


The blue is soft enough that the stringer was just mooshing it around.  The beads look so wonky that I'm just not happy with them.

So, I tried to do it with stiffer glass.  In this case, a transparent blue.  Transparent glass colors tend to be a lot stiffer at a given temperature than the opaque colors.


A little better, but still not at all what I want.

Not a single one of these beads today will end up in the final set of Boot Camp Beads, but this was definitely a learning experience.  Like the Day 19 beads, I was working in the wind.  It was not all that easy.  I'll try to do these over in the next day or two and see if I can't do it better.

Day 19

This was a more challenging bead than I had expected.  Here are a few of my initial efforts:


The circles of yellow are not always circles.  The white stripes are all over the place.  I really make some amateurish beads, here.

Now, in my own defense, it was a windy day, so the glass was losing heat fast, the stringer was whipping around a little, I was standing in a way to try to shield the torch flame from the wind, and the propane pressure was a little low.  Vapor pressure depends on the temperature of the tank and when the wind is cooling it off, the vapor pressure drops noticeably.  But still, these beads don't make the cut.

The better examples from this batch:


Still not perfect.  Here, one of these is done with the drawn circles of yellow (the one on the left).  The rest are stacked dots.  Since both methods were suggested in the boot camp document, I tried both.  The stacked dots were much easier to get nice and pretty.  

The wind still made torch work inconvenient.  


Wooden Toys!

I think everyone loves wooden toys.  There's something about them that is just more real than plastic toys.

I saw something last night when I was wasting time on the internet and it sparked an idea.  Here is how far I've come with it:


The little horses are meant to be reminiscent of the classic Dala horse from Sweden.  It is very stylized, but when you figure the people in this playset are just pegs with knobs on top, I reckon most kids can muster up the imagination to make these into noble steeds.

And, of course, a castle is a defensive structure, so these fine knights-to-be will need somebody to defend against.  Enter the Vikings!


A longship from a scrap of 2x4.

Still to be done: paint the peg people, add eyes to the horses, lacquer all the wood, make a bag to hold the parts for carrying or putting away.

Not a profound craft, but a fun thing to make on a Saturday afternoon.

And a big thank you to my lovely wife for not only encouraging me to make this, but for being so tolerant of me coming in the house all covered in wood dust "Man Glitter."  I'm the luckiest man in the world to have the wife I do.

Thursday, May 9, 2019

Boot Camp Bonus Beads

I am really enjoying working through the 21 Day Bead Boot Camp.  However, there are times when I want to play with something else.  I noticed a couple of beads in the illustrations from which the author was working that I found rather inspiring.


I've always liked these daisy-petal murini.  They come in all sorts of color combinations, but this one is fairly typical.  I made a pull of this pattern and cut slices of the pattern cane to make these beads.  They are not large and won't really stand out on a necklace or a festoon.  But I love beads that reward the person who really looks at the whole string.  Finding little treasures like this has always delighted me and I hope that I can find a use for them that will delight someone else who looks close.

And, of course, I never really have too many of the basic seed beads:


I like to warm up when I am making beads by starting with a few of these.  I think of it like stretching out before exercising.  And I really like that transparent red color.  


Day 18

Melon beads!  I've been making these for a long time.  I have a particular appreciation for this shape.  There's just so much tactile enjoyment with these.  It is common to make melon beads by rolling a bead over a grooved surface.  This leaves grooves that are the same depth all the way across.  Done properly, as these are (and as the examples in the Bead Boot Camp are), the grooves should follow around the bead all the way to the hole at each end.  This is much trickier, but also much more satisfying.

Day 17

More raking.  This time melted in and a stripe of color applied at each end.


Day 16

This was an especially interesting one because Dena Cowlishaw, who wrote the 21 Day Bead Boot Camp, had some trouble figuring out exactly how she was going to make it.  There's an excellent post on her blog here.  She tried several different methods and goes into some detail about them.  There's really no reason for me to reiterate her trials, but I truly appreciate that she shares with the world that some of these fairly simple looking beads are not as easy to replicate as one might assume.

She is working from a chart of bead designs that she links from her site.  This is a practical choice, since few of us have access to a lot of historical beads and the ones that really get the most exposure at museums and online tend to be the really outstanding examples, not the beads that are typical and run of the mill.

Here's the bead for today:


 And here's her result:


In my online explorations of bead sites, I found this picture:


In case you can't see the circled bead well enough, here's a close-up:


By the way, the site where I found this was here.  On that site, the photo was credited to Bornholms Museum, Ronne, Denmark. 

My own effort is based on the photo, not the chart.  For this, I created a striped stringer, shown here with one of my beads:


I made wider and narrower stringers and tried larger and smaller swoops, trying to get a reasonably representative example:


I also used a couple of base bead colors to see which I think comes closer to the original.  I'm thinking the aqua colored glass to the left looks better than the medium blue on the right.  Or at least looks more accurate.

I think the one all the way to the left looks most like the original.

I rather like these beads.

The use of the painted charts can be a good way to get a wide variety of beads to look at, but there are times when I know the person who painted the beads wasn't making this for bead makers to look at.  I'd like to see the point where the stringer is joined up in the zigzag/squiggle.  That would answer a question about how these were made.  I would love to see such a chart made up all of good quality photos of beads.  That would be such a gift to those of us who love historical beads.

Fresh Bread

My family suffered through some pretty sorry efforts at bread baking when I was learning how to do it right.  Nowadays, I make bread that I'm really proud to claim.

Here's a half loaf from yesterday's batch:

Just a basic white potato bread.  But I don't think anyone can find a better bread for a sandwich or toast or just everyday bread uses than this.  And yes, I'm bragging it up, but it a skill that took me a long time to learn well.  

My family eats very little commercial bread because I enjoy baking.  At one time, every penny was counted in every expenditure and I worked to trim costs where I could.  Home baked bread was half the price of store bread.  To save a couple of dollars a week I started making it from scratch.  Nowadays I keep on making it from scratch because I like it so much better.  


Day 15

Two thirds of the way through!

This one is a cylinder with raked stripes.  These can be called chevrons, though when you say "chevron bead" everyone in the bead world thinks of a very particular sort of bead that is made quite differently.


These are especially interesting for a couple of reasons.  First, they are the first beads in this challenge to use a tool for surface manipulation.  Second, unlike modern beads, the tool marks are left as a textural element.  In fact, from a modern bead maker's perspective, the hardest part about these beads was not taking the minute more to melt the surface all nice and smooth.  That gouge where the stripes were raked just feels wrong somehow.

BUT!  This is not unusual in original beads.  Leaving the gouge was apparently quite acceptable back in the day.  I can speculate about this, but nobody knows for sure why it is so.  My thought is that the glass workers who made beads back then were working with a heat source that was slow enough and relatively cool (compared to modern torches which are very hot and have a fairly small hot spot, so can heat just a small part of the bead for precise work, if that's what you want), so working the bead back to a smooth surface may have taken more time than it was really worth.  And if customers would buy it just the same, why spend the extra time and effort to get it worked smooth?  When you are paid by the piece, you try to make each piece as efficiently as you can.

I used black instead of the prescribed blue for the base bead.  In this case, I did it on purpose, not because I was looking at the colors wrong.  I have a black and red theme going with a lot of these beads, so wanted to keep it that way.

I really like that this bead is in the Bead Boot Camp.  Many years ago, when I was working on Islamic Folded Beads (another post for another day), I figured out how to get the effect I wanted once I started thinking in terms of how much heat was available, rather than just what the surface manipulation should be.  A large part of the visual effect is the tool marks left in the bead.  With this raked cylinder, it is the same.  Without that gouge in the surface of the bead, it just wouldn't be as "right" or as Viking-ish.

Wednesday, May 8, 2019

Day 14

Here's the next place the lack of color mixed me up.

The intended design:


Blue bead, white swirls, yellow dots.  Only the yellow looks white in the greyscale printout I have in the shop.

So, this is what I made:

 And I really like them a lot better than I would with the yellow dots.  I'm going to leave them as-is because I don't really care for the added dots.

Not all of these beads turned out the way I intended.  When I screw up a bead, I try to salvage it.  My usual method is to rake the surface into a different pattern.  In the picture below, that's what I did with the bead on the left.  Next one in, I poked and twisted with a stringer to get a whirlpool effect.  I wouldn't try to pass these off as historical, but they are still very pretty beads.


And when I had a bead that just needed something more than a surface treatment, I decided to add a little buddy.  Here's one of my geckos.


Day 13

Another zigzag bead.  This time on a bicone.


I like these.  They aren't anything amazing, but I like the bicone shape and I like the stark contrast between black base bead and white stringer.

Day 12

When I decided to do the 21 Day Bead Boot Camp, I printed out the PDF document for easy reference out in the workshop.  

Only problem is, I only have a black and white printer.

Now, this isn't a big deal, normally.  But this time, it threw me off a bit.  Here's the bead I was supposed to make for Day 12:


White bead, red stripes, blue dots.  Not a bad color scheme.  I knew that I would be likely to use ivory glass because I really like the subtle difference in color.  

Normally, I either read the description on the page or I look at the color pictures on my computer screen before I start making the beads.  But today I was confident that I remembered the color scheme just fine.

Here's what I made:


Not a bad job.  Very pretty, really.  But not the intended color scheme.  And Day 14's beads have a similar issue.  I'll get to those shortly.

I actually like the look of the beads better with this color scheme, so I'm not going to redo them, but I do feel rather silly for making that mistake.

Day 11

Squiggles!

This is a variation on the zigzag, but without the abrupt change in direction.  The tricky part is getting the ends to join up neatly.


And, a cautionary note:  If you use the much more affordable TIG rod for your mandrels, one end will be stamped with an identifier code.  This end is not suitable for being the end where you make the bead.  But if you dip that end in the bead release, you can't tell that there's a flat spot on the mandrel.  You know, a flat spot that would prevent the bead from coming loose...


Be smarter than I was.  After about 20 years of making beads, this is the first time I've done this.

A Video I Really Like

Normally, I intend to show work from my own workshop, whether I make it or someone else does with my help.  However, I wanted to boost the signal for this video because I think it is really a cool video.

How did people make glass beads before we had tanks of propane and torches to burn it with?  This video shows a historical method!

Reenactor making glass beads

It is worth your five minutes if you have any interest in historical beads at all.  Now I really want a place to set up one of these little charcoal ovens.

Tuesday, May 7, 2019

A Piece of Armor

Among my many hobbies in the past, I used to make armor for armored fighting.  I was recently contacted by an old friend who wanted a specific piece.  He wanted a demi-gauntlet, which is protection for the wrist and back of the hand.  I said I'd make it for him.  And today I had time to do it.


 First, the paper pattern is used to draw the necessary shapes on a piece of 16 gauge steel.


The pieces were cut out with a jigsaw (yeah, it is tedious and loud, but it works) and I took off the dark grey surface with my belt grinder.  I also deburred the edges so they won't catch on skin.


The cuff is the first part to be shaped.  I put a hint of a ridge in this one to emphasize the point in the cuff.  Flaring the edges is not just for show.  It reinforces them against bending when hit.


Now I'm working on attaching the cuff to the wrist plate.  I used three nylon straps.  I've made several of these that have lasted for years with the nylon straps.


The assembled demi-gauntlet.  Providing very good protection.


A hand strap keeps it snugged up close to the hand.


A shot to show the coverage of the base of the thumb.


It allows the hand to bend back as far as it can bend without any armor.


And it can bend to the side as far as without armor.  This should give full mobility and very substantial protection to my old buddy.  May he wear it well.

Monday, May 6, 2019

Sharing the Joy of Bladesmithing

When I take my dog to the dog park, I sometimes bring my spoon carving tools and some wood.  It leads to interesting conversations at times.  (Spoon carving thing is possibly the least threatening thing you can do with a sharp blade in a public place.)  One of the times I was there last summer, I met a woman who was very interested in the craft of making the blades.  We talked, I invited her to come make a knife when my schooling settled down.  Yesterday, she took me up on it and brought her husband and daughter to do it, too.


In the early stages, here are her daughter's hands working on a knife.


The dog part friend's hands working on hers.

I didn't get a picture of her husband forging his, but he really enjoyed it.


The completed knives.  I made two of these, one as an example so I could point out where we were heading, the other to demonstrate each step of the process.

I really like these little blacksmith knives for a first knife project.  They are sort of primitive, but they can be made start to finish in one day, the all-steel construction allows for some blacksmithing creativity in the design, and they are just a fun thing to make.  I normally suggest to people that they use them as steak knives.  It is fun to use a tool you made yourself.

At the end of the day, everyone was tired from all the hard work, but I think we all had a pretty good time.