Saturday, July 25, 2026

Birch Bark Strip Cutter

 Blogspot is putting the onus on me to inform you that this site uses cookies.  If you didn't see a popup, this is my effort to make sure you know.  

Birch bark is easy enough to harvest from a fallen tree. I never take from a healthy tree, though it certainly can be done without irreparably harming the tree – there's just enough available from fallen trees or firewood trees that there's no reason to deface a beautiful and elegant tree that's left standing. To harvest, just take a sharp knife and make a longitudinal cut through the bark. The only tricky bit is getting the first inch or so up from the cut. After that, I can usually peel the piece of bark from the entire circumference of the log. I just need that first inch to have something to hang onto.


The difficulty actually comes after the bark is off. Most birch bark crafts require cutting the bark. Stout scissors work fine, but are imprecise. Knives are excellent, but slow. If you want a lot of uniform strips for something like basket weaving, you need a way to slice up the bark uniformly.


My wife recently took a class at the local Folk School, where she got to see the birch bark cutter they had specially made by a machinist. It has two circular blades and can be set to give uniform strips of several different widths. I'm not a machinist and I don't pretend to be one, but I am pretty good at figuring things out when I have a goal in mind. So, I wanted to see if I could make a birch bark cutter that would make uniform 1/2” strips. That's a size that I think will be useful for woven sheaths (tuohituppi in Finnish) and also small woven baskets.


My starting point. A piece of oak I had in my scrap wood for enough years that I can't recall when or where I got it. A 45mm rotary cutting blade available wherever cloth cutting tools are sold. And a 5/16” bolt, two washers, and a nut. Also a few wood screws.

I cut a base 4” by 6”. Another 4”x6” piece yields the blade holder and what I'm calling the fence.


For the circular blade to fit through the blade holder, I needed a slot not much wider than the thickness of the blade.  I bought these miniature saw blades several years ago for a project I never made.  This is the first time I've ever taken them out of their package.

I forgot to take a picture before I started, but you can see an excellent slot in the blade holder.  I had to cut through from both sides, but careful work made it possible.  

Here, I'm cutting the groove for the blade to fit into in the base.  Notice that bar clamp holding it in place. This is pretty important, as I needed both hands on the drill to steady it.  And I don't like the idea of my fingers coming anywhere near that rotating little saw.  I even unplugged my drill when I changed the bit because the idea of that saw blade hitting my hand just gave me the willies.

I drilled pilot holes for the wood screws and a larger one for the bolt that will hold the blade.  Oak needs pilot holes because it won't compress like soft pine will.  The pilot holes also mean nothing is going to shift right as I drive the screws in.   

I also countersunk the holes so the screw heads will be flush with the surface of the wood.

With the blade holder screwed to the fence, I used the hole in the blade holder to guide the bit through the fence.  That bolt needs to go all the way through.

I screwed the fence onto the base and it is essentially complete.  Note the gap between the blade holder and the base.  My thought was that a close fit like this will make sure the bark doesn't bunch up in the cutter.  I learned later that a bigger gap would be better.

Here you can see the screws that hold the blade holder in place and the hole between them for the bolt.

Four screws on the base, all nice and flush.

Because the blade is essentially a circular razor blade, I needed both hands to carefully assemble the contraption.  But it should be pretty obvious what's going on.  I plan to make some sort of blade guard.  That slicer is up where careless fingers could be cut all too easily.

And here it is in use.  I used two bar clamps to hold it to my work bench because with one, it would shift and rotate a little bit.  I want the cutter to be steady.

And that's a nice, 1/2" strip of bark coming out!

However, not pictured is what happened next. I got the bark most of the way through, but there was a thick bit (the black knobby part of birch bark) and it was about 3/16” thick, being forced through a 5/32” gap. I got it in far enough to jam in place and had to take the fence off the base to get it loose. Doing this over, I'll plan for 1/4” gap. In this case, I don't think the tight gap is actually important to the function of the tool.


There you have it. Not a professional machinist-made instrument, but a functional birch bark cutter that does the job.

 If you improve on this, please let me know.  

Monday, August 4, 2025

Some tips on playing a lyre


This site uses cookies.  I don’t know why it doesn’t seem to give the pop-up warning, but I got a message that the burden of responsibility is apparently shifted to the people posting our blogs.  So, if you don’t want cookies from a free blog website, navigate away now.

The Anglo Saxon lyre has enjoyed a remarkable renaissance in the last couple of decades.  I first saw a photo of a reproduction lyre for the Sutton Hoo museum around the year 2000, give or take a few years.  At that time, I was not aware of anyone making them for sale.  I made my own.  It was a great example of ignorance at work, but it made sounds, so I was ready to try again.  And I did.  Several times.

Here's my latest, tuned in D, rather than my usual G:


The problem with having an ancient instrument that nobody plays is that there’s nobody to teach you how to play it!  And I was not really able to make up a method on my own.  So, I borrowed from another instrument of limited range.  The Finnish kantele.  The old style kantele has 5 strings, each with its own pitch.  If you want to see just how much music can be created with 5 notes, check out the videos posted by Arja Kastinen.  She’s amazing. 


Gerry Henkel, who makes kantele in the US, has a simple guide to playing on his website and that’s what got me started with figuring out the lyre.  I focused on the skills of playing chords, especially to accompany singing. 

 There’s one book I’m aware of about playing the 6 string lyre.  And that book suggests using one with 7 strings (not historical, but I totally see why a modern player might want more options).  That book starts with the idea that the instrument will mostly be used to play melodies, not chords to accompany a vocalist.  I take a different approach, in which I think the chords are the simplest place to start and the melodies can come later.  


Since there is no information available on how these lyres were strung and only a little on how they were tuned, most of this is guesswork and ignorance.  Feel free to disagree with what I have to say and just do your own thing.  No big ego going on here, just sharing a few things I’ve figured out.

I used to teach a class in the SCA on playing the Anglo Saxon lyre.  I taught how to tune it, how to hold it, how to form 3 chords and change between them, and how to sing along with the lyre.  We sang Skip To My Lou, Clementine, and The Fox.  In one hour, I took people who had never played an instrument before and had them able to change chords and sing lyrics.  I am not some amazingly gifted teacher, I just have a very simple approach to the lyre.  If you want to learn to play it, this is not a bad way to start.


Assumptions:

The big hand hole in a lyre is there because the left hand has some reason to access all the strings.  It would actually be simpler to make a flat board with a resonating cavity and no hand hole.  The only reason to do the work of making the hole is because that’s important to how the instrument is played. (A fair number of people seem to use the left hand only to keep the instrument upright, while the right hand does all the plucking of strings.  It is a lot of work to make the hole, to smooth it up, and generally make the lyre a nice thing to hold with a hand hole in it.)

The lyre will be used most often as a vocal accompaniment.  There’s no proof of this in a historical context.  I simply assume it for the purposes of my own approach to playing.  Essentially like using chords on a guitar, rather than playing every note of a melody.

There is some artifactual evidence of the use of a wrist strap for the left hand, especially from the find at Taplow.  I don’t know how common it was in the 5-10th centuries, but I also understand that Greek lyre players sometimes make use of a wrist strap, both in iconography and in modern reconstructed playing.  I find it really useful for just keeping my hand in position and controlling the lyre while I play.  Choose for yourself whether to use one or not.  I just wanted to explain what’s going on with the photos.

I further assume that you’ll tune your lyre just like mine. 


Tuning:

The kantele is tuned with the lowest string furthest from the player.  The modern harp is tuned with the lowest string furthest from the player.  The lyre is not a harp by modern definition, but was called a harp in the writings of the time it was in use, so I follow the configuration of both the harp and kantele. 

I tune my smaller lyres to the first six notes of a G scale.  Facing the instrument, I start with the lowest to the right and highest to the left, so you’d read it as EDCBAG. 


The modern guitar has the low to high relationship reversed from the harp.  And, please remember, a guitar is meant to make many notes on each string, while a lyre or harp makes one note for each string.  I believe the guitar is the reason so many modern players like the lowest string closest.  If you prefer it this way, reverse everything I do from here forward and you’ll be fine. 


Here’s a simple video of tuning:


Chords:


The left hand is placed in the opening of the lyre and can touch the strings.  When gently touching a string, that string is unable to sound its note.  This means that making chords is a matter of touching whatever strings I don’t want to sound and then strumming all the strings.  The notes that ring out audibly are the ones I’m not touching.  Make sense?  I hope so.

The left hand is through the strap, as you can see, and can easily access the strings from behind.  The following video shows how I hold it.


And here’s a video of making major chords:


A video about minor chords:


And some diagrams to show the chords in pictorial format: 


Sunday, February 16, 2025

What does my cigar box fiddle sound like?

 Keep in mind that I'm barely past Hot Cross Buns on the fiddle.  I'm not a competent player of what can be the most lovely and expressive instrument in the world.  But I am a guy who made this silly thing and wants to share it.  Just take it as an example of what a cigar box instrument sounds like.


Cigar Box Fiddle


(Warning!  This site uses cookies!  If you don't want cookies and haven't seen a warning popup, navigate away now.  For some reason, Blogspot seems to be placing the responsibility on me if you don't want them.)


I love the idea of a musical instrument made from junk. My wife tolerates my interest. Nothing presented here is really new or particularly innovative. It is just me turning a cigar box into a playable fiddle.  If you are planning to do the same, I hope this provides inspiration and ideas.


My starting point is a cigar box I got in Arizona while visiting family. The wood is just a piece of scrap wood I had in the workshop. I’m not sure what kind of wood it even is, just something hard. I know it isn’t maple, birch, or cherry, but I don’t know what it is. The first step was creating a plan. Just a big piece of paper, trace the cigar box, and estimate the rest of the details.


I cut out the neck shape and another piece for the heel.


This is how they’ll go together.


Some basic shaping on the belt sander before glue-up.


Drilling the holes for the tuners before I get the neck too far. I’m just using guitar tuning machines. I could make friction pegs cheaper, but the guitar tuners are easy to use and easy to install. And I don’t need fine tuners.


To make the tuners accessible to the strings, I need to open up a slot in the head. I could try to chisel it out like a standard violin peghead, but this is so much easier. Drill a couple of 3/4” holes…


...and use a scroll saw to connect them.


This is how the tuners will be installed.


The cigar box is fairly sturdy, being solid wood with actual finger joints at the edges, but I don’t trust it to be sturdy enough to withstand the string tension. So, here are a couple of 5/16” poplar scraps I had in the shop. I’m going to glue them into the ends to give a little more rigidity.


Like so.


And a bass bar, made from scrap pine, can be glued to the soundboard (bottom of the cigar box) while the end reinforcements are still clamped up.


Once the glue is dry, I can make the sound holes. This is not my idea, but when I saw another cigar box fiddle with sound holes like this, I thought it was brilliant. I just used my belt sander with the 8” wheel to sand out big notches. This does two things. It allows for the sound to come out and it creates the effect of the side bouts, which normally form the waist in a standard violin. An arched bridge is needed to access one string at a time with the bow, but the bow needs to be at a fairly steep angle to the bridge when playing the highest or the lowest strings. The waist of the instrument allows the bow to touch the string at such an angle.


And it looks really cool with a lot less effort than carefully cutting out a standard f hole.


Before gluing the poplar reinforcements into the box, I drilled pilot holes for a couple of screws and also hollowed out the parts that I didn’t think needed extra strength. Here, you can see why I wanted the screw holes. I don’t trust glue alone to be enough to hold on the neck. A normal violin has a mortise cut into the block of wood at the top of the body so the neck has a mechanical joint as well as the glue to hold it. I’m just being lazy and using screws.


Time to finish up the shape of the neck and blend the heel in. This is a bit chunkier than my actual violin’s neck, but it didn’t seem that way when I was out in the shop working on it. Seemed really delicate at the time.


Finger board of maple. (I actually ended up using a different piece of maple for the finger board, but the process is as shown here.)  


Shaped at the sander to get the arched surface.


And here’s how it will fit on the neck.


Some time back, I turned a piece of scrap wood on my dad’s lathe to make end peg buttons for a different project. Here are 3 spares, one of which is going to be part of this fiddle.


I cut one off, drilled and countersunk a hole, and found a screw to attach it.


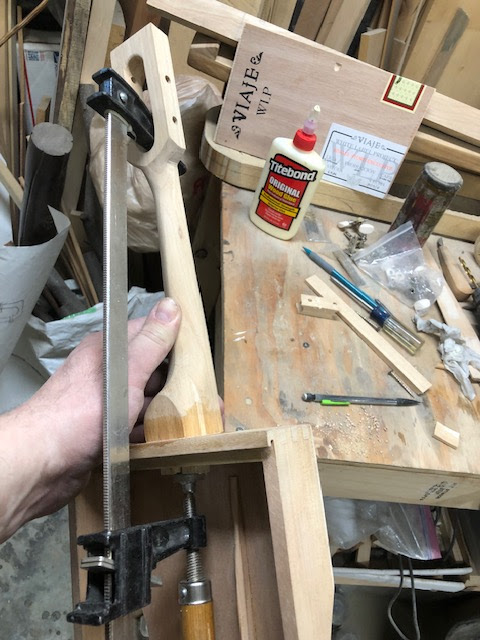
Attaching the neck. A very close observer will see that I didn’t actually use the planned screws. I drilled the pilot holes in the neck and heel just a little cockeyed and the screws wouldn’t work. I ended up redrilling them at 1/4” and putting in dowels instead. I hope it is strong enough. Anyway, just getting a clamp to hold the neck firmly in the right place was a bit of an adventure, but I ended up with a bar clamp doing the job pretty well.


The tailpiece!  I'll use the scroll saw to add little notches above the holes so the strings can sit in the notches and not pop out of the holes.  The tailgut is just going to be threaded through the two lower holes.


And here I’m estimating how high the bridge will sit. Way too low. There’s no way to access the strings with a bridge this low. I’d have to play all of them at once and that’s not what I want.


So more of that scrap poplar comes to the rescue! I made a wedge to sit under the finger board and raise the angle. Ordinarily, the neck is attached at an angle that allows for the strings to reach the bridge at the right height. I miscalculated the angle when I did this and I’m compensating with a wedge.


Gluing the box shut. The lid slides in grooves in the sides, rather than being hinged. With a good bit of wood glue, that lid isn’t going to slide ever again.


I used masking tape to cover the surface on the neck that will have the fingerboard and wedge glued to it. Then I wiped shellac over the body and head. I noted that violins normally have no finish on the neck where the musician holds it. This is because the lacquer is sort of grippy and it is hard to slide the hand to another position if there’s lacquer on the neck. I’m going to oil this wood later because I want the protection from dirt and hand oils, but the oil finish should allow for the hand to move as it needs to.


I put finish on the original stickers. Many cigar boxes have a lot more decorative paper on them, but I didn’t have one of the right size for a fiddle. In the future, perhaps I’ll get a box that will be covered with decorative paper like my cigar box jouhikko.


The bridge! A scrap of maple and a few minutes on the drill press and scroll saw.


Attaching the fingerboard. I had glued the wedge on to the fingerboard first.  It is starting to look like a fiddle!


Sound post! This serves to physically connect the top and back of the instrument. I’ve heard a couple of explanations for how it works to enhance the sound and both sound plausible. One says that this transmits vibrations to the back when the top vibrates. Thus, both the top and back of the instrument vibrate to contribute to the sound. The other explanation I heard says that this actually creates a relatively immobile point on the top, where the treble foot of the bridge (closest to the highest string) then rotates slightly to active the bass bar, which is below the lowest string. I don’t know which is more accurate or whether both are happening at once. I do know that a sound post in other instruments I’ve built makes a huge difference in both volume and tone.


I’m no expert on setting sound posts. Here’s my initial insertion with my pocket pliers.


And a tool made from scrap wire to adjust the placement.


Good enough for now.  Depending on the sound, I may have to adjust the location of this sound post to get better tone or volume.  Not that I expect much from a plywood soundboard in a cigar box that is essentially a waste product.  But we shall see.


A nut is made from scrap maple. It kind of matches the fingerboard. String grooves in the nut are made with a tiny file.


And here it is, all assembled! I used a set of the absolute cheapest violin strings on Amazon. I think I got half a dozen sets of strings for maybe $15. I’d be ashamed to show them to my daughter’s violin teacher. For this instrument, though, I’m not going to drop $50 on a set of strings when I have less than $20 in the rest of the instrument. Half of that is for the guitar tuners.


But tuning it showed me that there’s an issue with that tailpiece. It seemed like a great idea to drill holes that would let the ball ends of the strings drop through and then the string would fit into the little slot. Only the tension of the string caused the ball end to rotate up and out of the hole, so the strings wouldn’t stay put!


A new tailpiece took maybe 10 minutes to make.


And it is done. It sounds remarkably more violin-like than I imagined. Check back tomorrow for a really badly played sound sample.