Wednesday, May 8, 2019

Day 14

Here's the next place the lack of color mixed me up.

The intended design:


Blue bead, white swirls, yellow dots.  Only the yellow looks white in the greyscale printout I have in the shop.

So, this is what I made:

 And I really like them a lot better than I would with the yellow dots.  I'm going to leave them as-is because I don't really care for the added dots.

Not all of these beads turned out the way I intended.  When I screw up a bead, I try to salvage it.  My usual method is to rake the surface into a different pattern.  In the picture below, that's what I did with the bead on the left.  Next one in, I poked and twisted with a stringer to get a whirlpool effect.  I wouldn't try to pass these off as historical, but they are still very pretty beads.


And when I had a bead that just needed something more than a surface treatment, I decided to add a little buddy.  Here's one of my geckos.


Day 13

Another zigzag bead.  This time on a bicone.


I like these.  They aren't anything amazing, but I like the bicone shape and I like the stark contrast between black base bead and white stringer.

Day 12

When I decided to do the 21 Day Bead Boot Camp, I printed out the PDF document for easy reference out in the workshop.  

Only problem is, I only have a black and white printer.

Now, this isn't a big deal, normally.  But this time, it threw me off a bit.  Here's the bead I was supposed to make for Day 12:


White bead, red stripes, blue dots.  Not a bad color scheme.  I knew that I would be likely to use ivory glass because I really like the subtle difference in color.  

Normally, I either read the description on the page or I look at the color pictures on my computer screen before I start making the beads.  But today I was confident that I remembered the color scheme just fine.

Here's what I made:


Not a bad job.  Very pretty, really.  But not the intended color scheme.  And Day 14's beads have a similar issue.  I'll get to those shortly.

I actually like the look of the beads better with this color scheme, so I'm not going to redo them, but I do feel rather silly for making that mistake.

Day 11

Squiggles!

This is a variation on the zigzag, but without the abrupt change in direction.  The tricky part is getting the ends to join up neatly.


And, a cautionary note:  If you use the much more affordable TIG rod for your mandrels, one end will be stamped with an identifier code.  This end is not suitable for being the end where you make the bead.  But if you dip that end in the bead release, you can't tell that there's a flat spot on the mandrel.  You know, a flat spot that would prevent the bead from coming loose...


Be smarter than I was.  After about 20 years of making beads, this is the first time I've done this.

A Video I Really Like

Normally, I intend to show work from my own workshop, whether I make it or someone else does with my help.  However, I wanted to boost the signal for this video because I think it is really a cool video.

How did people make glass beads before we had tanks of propane and torches to burn it with?  This video shows a historical method!

Reenactor making glass beads

It is worth your five minutes if you have any interest in historical beads at all.  Now I really want a place to set up one of these little charcoal ovens.

Tuesday, May 7, 2019

A Piece of Armor

Among my many hobbies in the past, I used to make armor for armored fighting.  I was recently contacted by an old friend who wanted a specific piece.  He wanted a demi-gauntlet, which is protection for the wrist and back of the hand.  I said I'd make it for him.  And today I had time to do it.


 First, the paper pattern is used to draw the necessary shapes on a piece of 16 gauge steel.


The pieces were cut out with a jigsaw (yeah, it is tedious and loud, but it works) and I took off the dark grey surface with my belt grinder.  I also deburred the edges so they won't catch on skin.


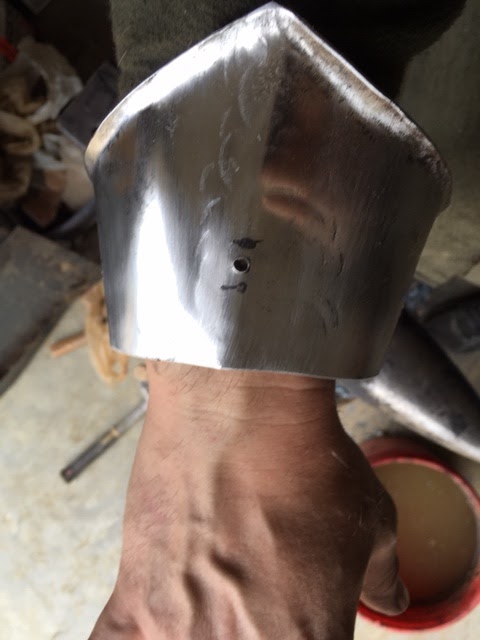
The cuff is the first part to be shaped.  I put a hint of a ridge in this one to emphasize the point in the cuff.  Flaring the edges is not just for show.  It reinforces them against bending when hit.


Now I'm working on attaching the cuff to the wrist plate.  I used three nylon straps.  I've made several of these that have lasted for years with the nylon straps.


The assembled demi-gauntlet.  Providing very good protection.


A hand strap keeps it snugged up close to the hand.


A shot to show the coverage of the base of the thumb.


It allows the hand to bend back as far as it can bend without any armor.


And it can bend to the side as far as without armor.  This should give full mobility and very substantial protection to my old buddy.  May he wear it well.

Monday, May 6, 2019

Sharing the Joy of Bladesmithing

When I take my dog to the dog park, I sometimes bring my spoon carving tools and some wood.  It leads to interesting conversations at times.  (Spoon carving thing is possibly the least threatening thing you can do with a sharp blade in a public place.)  One of the times I was there last summer, I met a woman who was very interested in the craft of making the blades.  We talked, I invited her to come make a knife when my schooling settled down.  Yesterday, she took me up on it and brought her husband and daughter to do it, too.


In the early stages, here are her daughter's hands working on a knife.


The dog part friend's hands working on hers.

I didn't get a picture of her husband forging his, but he really enjoyed it.


The completed knives.  I made two of these, one as an example so I could point out where we were heading, the other to demonstrate each step of the process.

I really like these little blacksmith knives for a first knife project.  They are sort of primitive, but they can be made start to finish in one day, the all-steel construction allows for some blacksmithing creativity in the design, and they are just a fun thing to make.  I normally suggest to people that they use them as steak knives.  It is fun to use a tool you made yourself.

At the end of the day, everyone was tired from all the hard work, but I think we all had a pretty good time.